
Installation
upload, activate, pick a preset.
Two ways to install, what activation does to your site, and the one-step setup card that chooses your policy.
01Find the plugin ZIP
Unzip the main download from CodeCanyon ("All files and documentation") first. Inside you find:
| Path in the download | What it is |
|---|---|
source/cryptometer.zip | The installable plugin. This is the only file you upload to WordPress. |
source/cryptometer/ | The same plugin, unzipped, so you can read the source without unpacking anything. Use it for Option B below or to look at the code; you do not need both. |
documentation/ | This documentation, offline. Open documentation/index.html in a browser. |
licenses/ | The licences of the third-party components. |
Do not upload the whole download to WordPress: it is not a plugin ZIP, and WordPress answers "No valid plugins were found".
02Option A: upload in WordPress (easiest)
- Log in to WordPress as an administrator.
- Go to Plugins → Add New Plugin and click Upload Plugin.
- Choose
cryptometer.zipand click Install Now. - Click Activate Plugin.
03Option B: upload by FTP / SFTP / file manager
- Take the folder
source/cryptometerfrom the download (or unzipsource/cryptometer.zip: you get the same folder). - Upload that folder to
wp-content/plugins/so thatwp-content/plugins/cryptometer/cryptometer.phpexists. - In WordPress go to Plugins and click Activate under "CryptoMeter – AI Crawler Control & Bot Verification".
04Try it first on a local test site (optional)
There is no hosted demo of this plugin: a public demo would be a public WordPress admin. You can see every screen on your own computer in a few minutes, with nothing to buy or sign up for:
- Local (free desktop app for Windows, macOS and Linux, localwp.com): create a site, open its WordPress admin and install
source/cryptometer.zipas in Option A. - WordPress Playground (needs Node.js 20 or newer): in a terminal, inside the folder that contains
cryptometer, runnpx @wp-playground/cli@latest server --mount=./cryptometer:/wordpress/wp-content/plugins/cryptometer --login
then open the address it prints, go to Plugins and activate CryptoMeter. This is how the author tested the release (PHP 7.4 and 8.4). - wp-env (needs Docker):
npx @wordpress/env startin a folder with a.wp-env.jsonof{"plugins": ["./cryptometer"]}.
The terminal commands work in the macOS and Linux terminals. On Windows use WSL or Git Bash, or choose Local, which needs no terminal at all. On a local site the verification verdict of your own test requests is "Unknown", because no vendor list covers a local IP address.
05What happens on activation
- Four database tables are created:
{prefix}cryptometer_log(bot activity log),{prefix}cryptometer_referrals(daily referral counters),{prefix}cryptometer_hits(daily traffic counters) and{prefix}cryptometer_payments(Monetize payment ledger). - Default settings are saved. The default policy Get cited, block training is enforced immediately: AI training crawlers get HTTP 403; search engines, AI search and user-triggered agents read normally. Monetize is off.
- A random site secret is generated (used only by Monetize access passes).
- The addresses
/llms.txt,/license.xmland/.well-known/tdmrep.jsonare registered (the last two answer 404 until you turn them on under Signals). - Scheduled tasks are added (WP-Cron: daily, hourly, weekly) and a first download of the official IP lists is scheduled about a minute later.
- You are redirected to CryptoMeter → Overview (unless you activated several plugins at once).
A CryptoMeter menu appears in the admin sidebar. It opens one page with the tabs Overview, Activity, Referrals, Bots & rules, Signals, Monetize and Settings. The Plugins screen gets a Dashboard link under the plugin name.
06First run: the setup card
Until setup is done, the Overview shows the Set up CryptoMeter card, and the WordPress Dashboard and Plugins screens show the notice "AI bot traffic is being logged. Pick how AI bots should be treated in one step." with a Finish setup link.
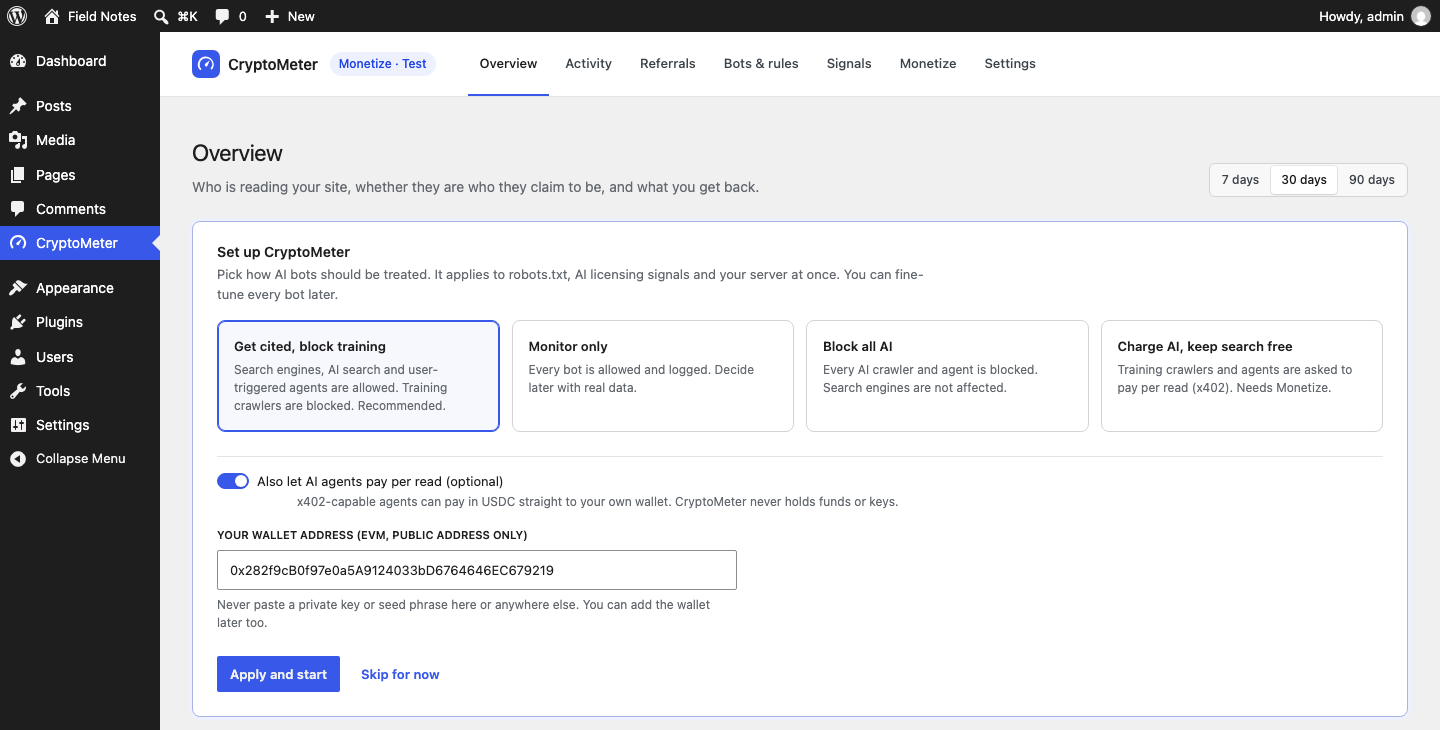
- Policy preset: choose one of the four presets below.
- Also let AI agents pay per read (optional): leave off for pure traffic control. If you switch it on, a field Your wallet address (EVM, public address only) appears. You can also add the wallet later under Monetize. Never paste a private key or seed phrase.
- Press Apply and start, or Skip for now (keeps the current settings and hides the card).
07Presets
A preset sets the policy of each intent and, except for Monitor only, the published search / AI input / AI training preferences (robots.txt Content-Signal, Content-Usage, RSL, TDMRep), so the signals say the same thing the server does. Block all AI publishes ai-input=no, ai-train=no; the other presets publish ai-input=yes, ai-train=no. You can fine-tune everything later on Bots & rules and Signals.
| Preset | Search engines | AI search & answers | AI agents (user-triggered) | AI training | Exceptions |
|---|---|---|---|---|---|
| Get cited, block training (default) | Allow | Allow | Allow | Block | Bytespider: Block |
| Block all AI | Allow | Block | Block | Block | none |
| Monitor only | Allow | Allow | Allow | Allow | none |
| Charge training and agents (needs Monetize) | Allow | Allow | Charge | Charge | Bytespider: Block |
Applying a preset replaces the intent policies and removes per-bot exceptions. Rate limits and custom bots are kept. The Charge preset can only be chosen while Monetize is on.